Unit Test
Unit Test
Definition: What is a unit test?
Unit testing, also module testing or component testing, is a software development process, in which the smallest testable parts or units of an application, called units, are exmained individually and independently of each other on their proper operation.
유닛 테스팅이란 말하자면 클래스 안에 정의 된 메서드를 하나씩 “고립” 해서 테스트를 하는 테스트 방법이다. 여기서 중요한 점은 “고립” 이라는 단어인데, 테스트가 될 메서드는 테스팅 코드 안에서 완전히 독립되어 테스트가 되어야 한다.
Goal: What is the main goal of unit test?
The main purpose of unit tests is to isolate the code to be tested and determine if it works as intended.
Motivation: Why should we do unit test?
Unit tests are an important step in the development process, because if they are carried out correctly, they can help cover early code errors that my be more difficult to find in later stages of testing.
유닛 테스트는 개발 과정에 있어 중요한 단계이다. 유닛 테스트는 보통 메서드 코딩의 첫 단계에서부터 코딩되기 시작하고 하나의 메서드가 독립되어 테스트가 되기 때문에 테스트 될 메서드는 이른 단계에서 테스트가 시작 될 수 있다. 그 결과 개발자들은 테스트의 후반 단계에서 더 찾기 어려운 초기 코드 오류를 효과적으로 커버할 수 있게 된다.
Test-driven Development, TDD
Unit Testing is a field of test-driven development (TDD), a methodology that follows a careful approach to creating a product through continuous testing and revision.
This method of testing is also the first stage of software testing that is performed before other methods of testing, such as integration testing. Unit tests are typically isolated to ensure that a unit does not rely on external codes or functions.
How do unit tests work
There are four steps for unit testing: Planing, Defining of test cases, Coding (Implementation) and Testing
- Planing: In this step we prepare testing: Test files are created, Test-Framework is built.
- Defining test cases: Test cases are defined. First, an failed unit test will be written.
- Coding: Then we start with the real implementation of the method that will be tested.
- Testing: The coded method will be tested.
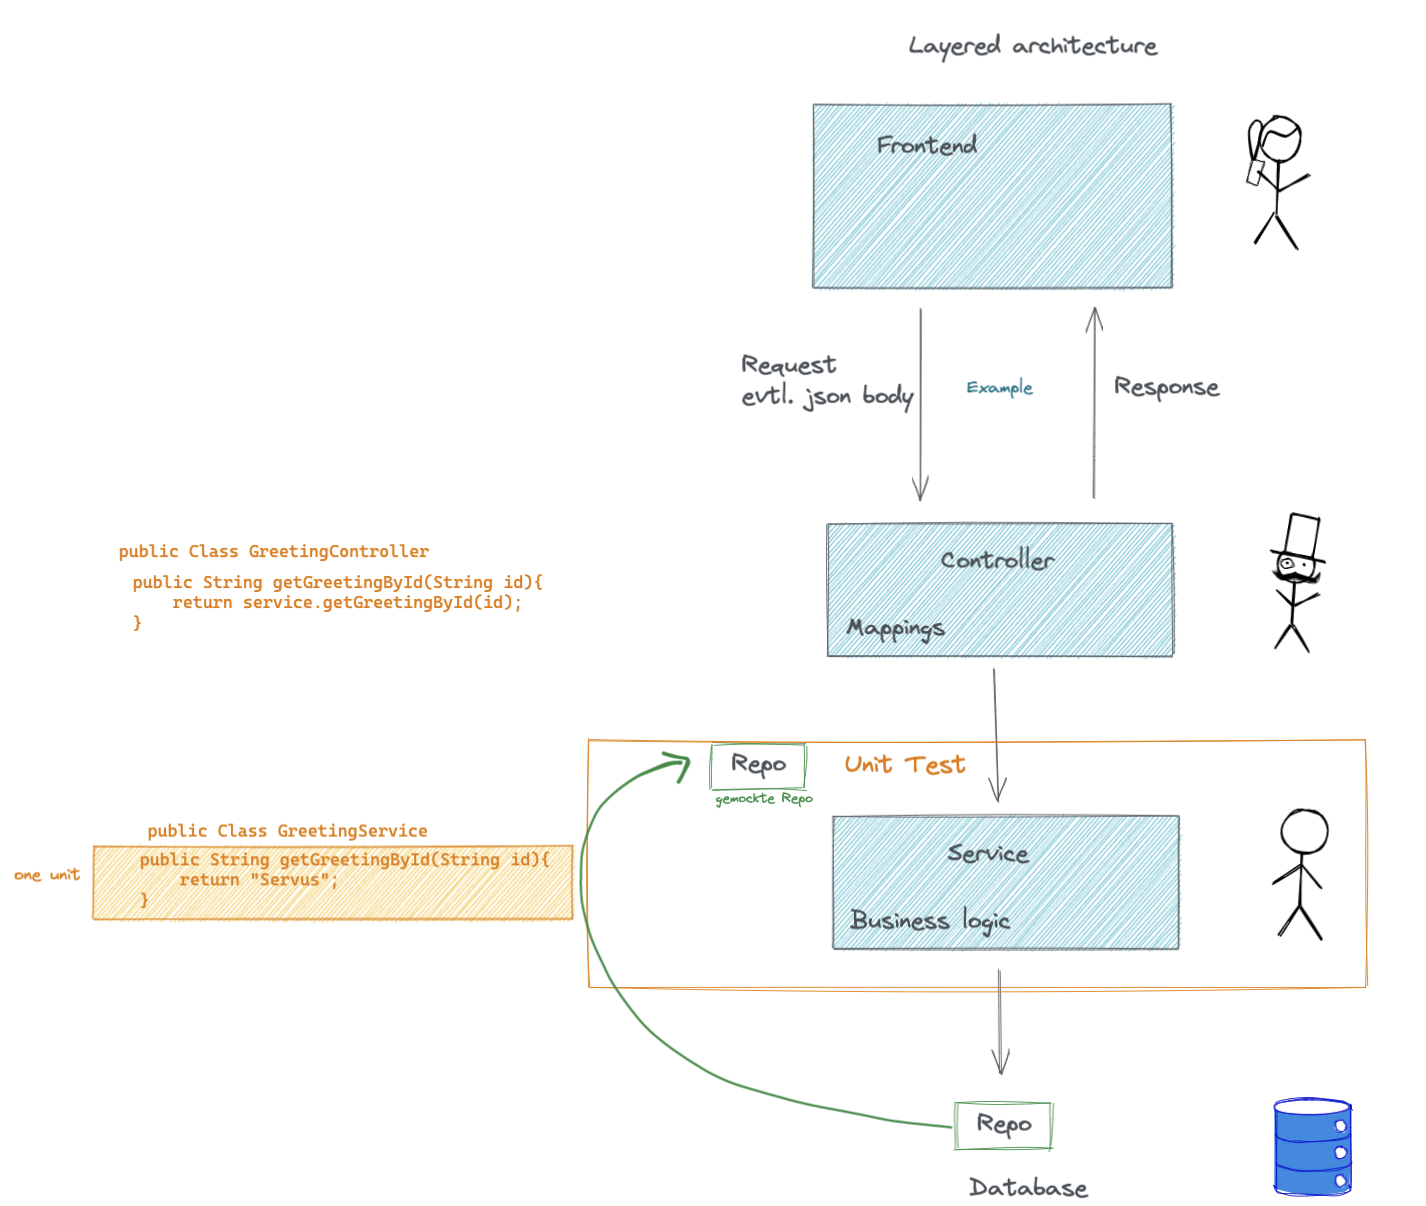
In the lower picture, it’s shown again with an example.

From the frontend, user send a request (“ I want a greeting word”) to the backend.
In backend the controller receives the request and looks for appropriate method (eg. getGreetingById).
Then the controller calls the service class where the actual implementation (business logic) of the getGreetingById method is implemented.
public String getGreetingById(String id){
return "Hello!";
}
But how do we have to test this method?
The upper method is too easy to test, but let’s imagine that the method is a very complex method. Let’s create a test method for the method step by step.
First, the following questions should be answered for planning purposes:
- What method is being tested?
- What kind of test framework is used?
Question 1 is already answered, and for question 2, we assume that we’re using the JUnit framework because the sample method is written in Java.
Then a test case should be defined. When we started implementing the method, the method was too difficult to implement immediately, so we could only build a basic framework for it. We could, because we knew the return value should be a string. We’ve written the method in the first place:
public String getGreetingById(String id){
return "";
}
Now let’s go to the test method.
A test method can be implemented in three sections:
//Given, //When and //Then
In //Given, we enter our “assumption”. Or we’ll enter parameters that should already be predicted. In the upper example, an id should be given because the method takes the id as input parameters.
Then let’s move on to the next step: //When.
//When, it comes to understanding, “If the test method is performed in the service class with the parameters in //Given, what is the result?”
So here’s the test method, and its result is called “actual” after the convention.
Then the last section //Then is written. This is a comparison of the actual value and the expected value.
The expected value is first defined. We usually know that before planning the test method. In this example, it should come out a greeting word “hello!”. Of course, there are cases where it’s difficult to determine the values of methods, but it’s not covered in this article.
So we set the expectation value and we compare the value to the is value.
All the code lines should look like this:
@Test
void getGreetingById_ShouldReturn_HelloByGivenId(){
   // GIVEN
   String id = "1";

   // WHEN
   String actual = service.getGreetingById(id);

   // THEN
   String expected = "hello!";
   assertEquals(actual, expected);
}
assertEquals(actual, expected) means actual and expected must be the same.
Let’s go back to our sample method.
We said in the basic device of the method that the method gives out an empty string of “ “.
This implementation then leads to a failed result in the test, since actual in the test method is an empty string, while our expected is a hello!.
So we’ve seen that our first implementation of the getGreetingById method is wrong. The return value should be adjusted to hello!.
After adjusting the return value, the test of the method should be successful, so we have completed the getGreetingById method.
So I briefly explained in this article what “unit testing” is and what developers need to do.
To make this easier to understand, I’ve come up with a very simple example. Of course, unit testing is not that easy in practice. But I believe that with my example, the principle of unit testing was well understood.
Spoiler for next article 🚀: mocking in unit test. This will be even more interesting 😉
If you’d like, you can leave your opinion/feedback to this article as a comment. Even if I’ve described something stupid, you’d like to correct me.

댓글남기기